How To Make Your Own Toddler-Friendly Cardboard Board Game
Being stuck inside on a rainy day with toddlers can be difficult without activities to keep them entertained! If you’re having trouble coming up with something new, creating a toddler-friendly board game might be just the idea for you. You can tailor it to your child and involve them in the whole process of creating it. After you create the game, you can also continue to enjoy it for many days to come!
Today was a cold rainy day for us and while our area is on stay at home orders I’ve been trying to think up some creative new ideas to keep the kids entertained (and hopefully keep us all from going stir-crazy!). Our oldest daughter has really been enjoying playing Candy Land and Chutes and Ladders over the last many weeks while we’ve been home, so the idea came to me today to make our OWN board game!
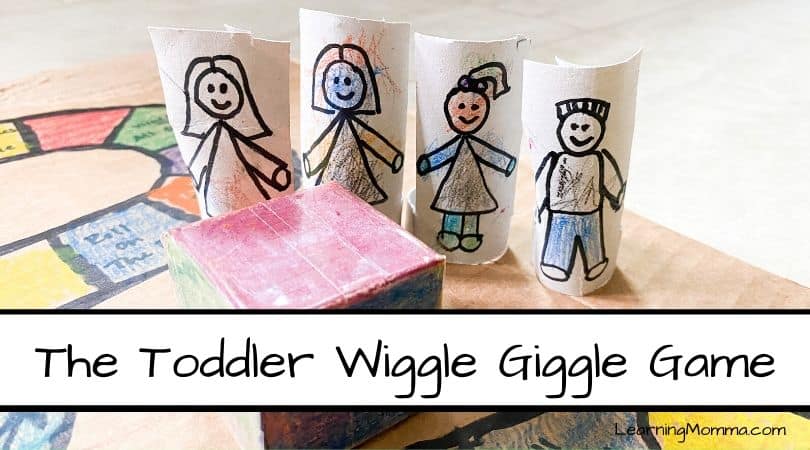
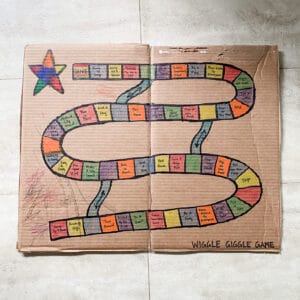
We combined the color-coded navigation method of Candy Land (which is great for kids too young to count well) with the fun of some up and down paths like Chutes and Ladders and added our own level of silly to encourage wiggling and laughter. Our game features a colored dice to avoid the need for a messy pile of cards and made customized game pieces from toilet paper tubes. (Even our 1-year-old enjoyed coloring in her game piece character!) We call our game the Giggle Wiggle Game! (Although our 3-year-old prefers to refer to it as the Wibble Wobble game.)
In this post, I’m going to outline the steps we took to create our game – but there are no rules! Create your own game with whatever supplies you have on hand and with features that your kiddos will love. The activity was a rainy quarantine day hit in our house!

The Supplies We Used To Build Our Own Toddler Board Game:
- A large cardboard box
- Markers
- Crayons
- A box cutter
- Scissors
- Packing tape
- Scotch tape
- 2 Toilet paper rolls
- A thin cardboard box (we used a granola bar type of box)
How We Built Our Toddler Board Game:
- Cut out two large identical rectangles from each side of your cardboard box.
- Use a dark marker to outline a game path with spaces in it across the two cardboard pieces. (I outlined the game path with chalk on the cardboard first to make sure it fit well and then went over it with a black marker.)
- With a dark marker, write fun instructions (or whatever you want!) into each game space. We filled each space with one of the below instructions, using each one twice and leaving a few spaces blank:
- Jump up and down
- Reach up high
- Turn around
- Pretend to be a cat
- Do a dance
- Tickle someone’s feet
- Be a frog
- Blow kisses to everyone
- Wiggle all over
- Tell a joke
- Skip
- Roll on the floor
- Hop on one foot
- Clap your hands
- Give a high five
- Fall down
- Give a hug
- Run in place
- Make a silly sound
- Pat your head
- Sing a song
- Make up a song
- Pick 6 crayon colors that show up well on the cardboard. Color each game path space in a sequence with the crayons, being careful that the instructions in each space can still be read.
- Use the dark marker to add up and down paths between spaces that have no instructions written in them and color the paths with a crayon.
- If you want to add a little bit more flair and give the kids more to color, you can also add a symbol or drawing to the finish line or let the kids decorate the rest of the game board. (Our 1-year-old had a blast scribbling all over the corner of our board and our 3-year-old colored in the star at the finish line.)
- To finish your game board, line up the two big cardboard pieces for your board and place a small piece of packing tape at the top and bottom edge of them where they join. Then flip both pieces upside down and place a large piece of packing tape all the way down the back of the board where they join. (Tape only on the back so that you can fold the board for storage.)
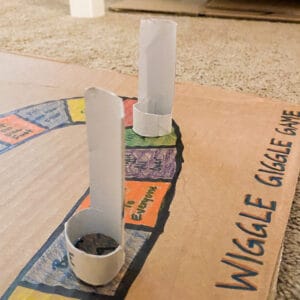
- To make toilet paper tube game pieces cut each tube with a thin band at the bottom and a larger vertical section. Don’t cut out all the way to the top of the tube and you can get two game pieces out of each tube. Cut all the way through the thin bottom band and overlap it tight to make smaller circumference for the base. Tape the band together with scotch tape and draw a character on the vertical section! (I drew a character on each one and had our girls color them in.)
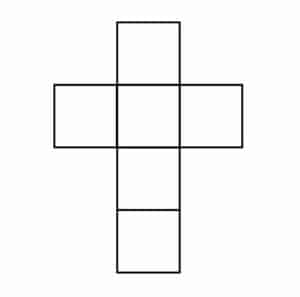
- To make a colored dice find thinner cardboard (like a cereal box) and cut out the below shape, making sure that each square is exactly the same dimensions. Color each square with one of the six colors that you used on your game board spaces. Then fold along each line and tape each side together. (I covered the whole dice in packing tape when it was done so that the crayon wouldn’t smear on our fingers and to help make the dice more sturdy – but you wouldn’t have to do that.)
That’s it, you’re done! Your game is ready to be played!
Again, there’s no right or wrong way to create your own cardboard box board game for a toddler. The above directions just outline the steps that we took and the materials that we used to create ours.
As we were playing, our 3-year-old stated, “I LOVE this game” – so I know it was a hit! We played it twice in a row and she begged to keep playing. I have a feeling it will be bringing hours more of silly entertainment to our crew over the next several weeks!
If you’re looking for some new ideas to keep your toddler entertained I hope that this one helped! You can also read my step by step instructions for creating paper beads with toddlers, print my free alphabet coloring pages with objects, or check out my homemade playdough recipe if you need a few more activities.
–